During the 1980s when Personal Computers were coming up in the main stream, operating systems like DOS came up with some utilities that allowed diagnosis of the disks. At those times, the only type of disks that were supported were the Floppy Disks and we are all aware that these disks had smaller sizes in terms of capacities. The most sought after utility was a small program called the chkdsk – meaning – Check Disk.
What is chkdsk?
The chkdsk, check disk, utility allowed the user to scan the drive for errors. These errors were in terms of back sectors and was restricted to scanning only. DOS did not come with any methods to fix these errors. However the reporting of the bad sectors was done using the check disk.
As personal computers became more popular, more research was being done to increase the capacity of the disks and soon we saw the usage of hard disks on the personal computers. Soon the size (capacity) of the hard disks started to increase and poor check disk was restricted in its use as it could not handle the hard disks of over a size.
What About Norton Tools - NDD(Norton Disk Doctor)?
Then came Dr. Peter Norton who took the world of computing to a surprise with his Norton Tools. These tools were a bunch of tools that not allowed to scan the hard disks but also allowed to fix the errors. They also allowed the users to move the data stored at the lowest level – in terms of tracks and sectors – so that most of the data could be recovered and restored.
What Is ScanDisk?
It was in 1995 that Microsoft launched the first version of its GUI (graphical user interface) based operating system – Windows 95 and this is considered to be a turning point in the history of PC (personal computers). Since then, the computers hardware has been undergoing rapid changes and the most essential part is the use of ever growing capacities of hard disks.
Microsoft Windows 95 shipped with the Graphical version of the ChkDsk utility and Microsoft named it Scan Disk. This tool was also available in the stand alone versions of Windows 98 and Windows ME. The use of the Scan disk was limited primarily to checking the hard disk for errors and unfortunately it was more derived from the CHKDSK utility and therefore provided no remedy for correcting these errors.
Then when Microsoft intervened in the area of Operating Systems for Servers, it had to attach some more functionality to the Scan disk utility. This is when it attached the Analyze and Fix features in its Network based Operating Systems.
For the general user, on Windows XP and Windows Vista and also on Windows 7, the scandisk utlity comes with features that can be used to fix the problems on the hard disks.
How To Scandisk my Drive or Partitions?
To start Scan Disk on the Windows XP and above, you have to select the Drive – which can be a complete partition or a partition of the current harddisk.
This is how you have to start it out –
1. Open My computer and from there select the disk on which you want to run the scandisk tool.
2. Right Click and Select Properties to display the properties dialog box on the screen
3. Once on the Properties dialog box, select the Tools Tab. It is here that the Scan Disk tool is available.
4. To start the scan disk tool, click on check now in the Error Checking Section. This will display the ScanDisk Window and it is here that you can instruct how you want to scan your disk.
5. On the window of scandisk you would find a couple of check boxes and these are the ones that decide how the scan disk should function. Following is a brief description of the options –
a. Automatically fix File System Errors – If you select this check box, the scandisk would do a thorough scan of your hard disk and will attempt to fix all of the system errors that it might encounter during the checking of the disks. The various file system errors that it can try to fix for you are lost clusters erroneous entries in the Tables used by the system (FAT or NTFS). This option when selected takes a lot of time depending on the capacity of the drive in question. It also takes time when you drive contains more data.
b. Scan for Attempt Recovery of Bad Sectors – This check box when selected, instructs the operating system to try and recover the areas that are getting bad. Selecting this does not ensure that the hard disk would be free from all errors after the scan but you can try this as an attempt to recover the areas that are getting bad. During this phase, the operating system will check for the bad sectors and try to recover the data if possible.
c. Once you are decided what to do, click on the start button.
Notes:
1. If you are selecting the second option “Scan for Attempt Recovery of Bad Sectors” windows will automatically perform the first option for you and this means that you need not select the first option.
2. You would need to stop using any of the content on this disk before starting a scandisk on this drive. This means that you should not be using any data file or program file that is stored on this partition of the disk. If the drive is currently in use, windows displays a message asking if you want to reschedule the disk checking for the next time you restart your computer. Your drive is not available to run other tasks while the disk is being checked.
3. For a complete checkup of your disks and increase the speed of access to files and content of the disk, you would also need to perform Defragmentation of your hard disk.
Hope you liked this post. Its been a long time that I was away and now that I am back, I hope that my visitors would be happy. I welcome your feedbacks as ever.
Cheers.
After using windows for so many long years and installing applications for use and testing on the platform always clutter up my taskbar. Maybe yours too is a similar story. Over the period I realized that the right hand side of my taskbar, also known as the Notifications Area, should be displaying the time on the pc is messed up with icons waiting for my clicks... and of course I rarely click on them.
In today’s post I will be telling you the trick to clear up that space and make it available for some more running applications that are displayed on the taskbar.
You might be starting to think Do I really need to do this? There is always a Button on the left side of the clock placeholder that is supposed to show or hide the icons in the tray. Yes, I know that this is true and one can make use of it when there are too many icons in that part of the taskbar. But the point is Do I really need that number of icons there? The answer to this is simply NO. I will need only a few icons there.

Where Do The Icons in the Notifications area Come From?The Icons that appear in the notifications area are the result of installations of different softwares or programs on your computer. To be clear there are two different categories of icons that get placed in that part of the taskbar. Some of those icons are placed here due to the fact that they are set to be the icons of start up applications - that is, those applications that start out when the computer starts. The second category of icons in this part comprise of the applications that are executed due to manual application and instead of using the normal task bar space, they get placed here (may be manually or automatically) for quick access.
I think, the applications that automatically start off, do not require to be placed here as most of these are essential to the running of the windows operating system itself. And again we can control their automatic starting from the msconfig utility of windows. But for those that get placed here manually - like I may hide my VLC player when it is playing the audio songs or the database server startup and management icon or even the camtasia recorder when I am busy recording something or even the chat applications like GTalk and yahoo messenger, these icons should be allowed to be present as they provide quick access to the applications that I am working on currently.
How To Manage The Icons In The Notifications Panel
Here is how you can remove the icons that appear on the right hand side of the Taskbar (on Windows XP) -
1. Right click on the Taskbar and then select the Properties to display the Start Menu Properties dialog box.
2. On the Dialog box, look for Customize Button in the notification Section. This will display the list of icons that appear in the Notification Area. The dialog box has two distinct Columns - The first one displays the name of the application and the other column controls and displays the settings for this applications availability and accessibility via the Notifications area. Please note that this trick will not allow you to get the icons removed. The only thing that this exercise will result in is to hide / display the icons on the Notifications area. That’s all there is to be done.
How To Change The Settings
Here is how you can change the settings for any application that has an icon here in the Notifications Area -
Select the second column, titled "Behavior" in the dialog box, for the application whose Icon you want to display or hide. This will activate a drop down list of options from where you can select an option as per your choice. The following are the available options -
1. Hide When Inactive
In case you want the Icons to appear when the application is running and hidden when the application is not being used, select this option. As the option indicates the application with this setting will be able to display the Icon in the Notifications area only when the Application is in use. For me, this is best suited for the Applications like Chat Messengers - Gtalk, Yahoo Messenger and MSN as I want them to appear for quick accessibility only when they are in use. Otherwise I don’t need them there. Reason is that I can always start them from the usual method - clicking on the Shortcut on the Desktop or the Start -> Programs Method.
2. Always Hide
This setting will force the application never to show its icon on the Notifications area. Though the application may be running but the icon for the application will never appear in the notifications area. This is good for applications that put their icons in the Notifications area but are rarely or ever used. For me this works fine with the Icons for the Graphic display as these rarely need to be changed or accessed.
3. Always show
This setting will force the applications icon to be displayed in the Notifications area even if the application is not running. This setting is best for applications that you frequently use or access multiple times during the day.
Click OK to make the changes you have made.
Oh yes, I forgot, you can click on the Restore Defaults button anytime to get the settings to their default.
Hope you found the post useful. Feedback would be appreciated as ever.
Cheers.
Ever been to a new place and realized that you are lost just because you do not have a map? That’s exactly what happens when you land up at a very big site searching for something very small (for them). How often you would have wondered that it would have been a great idea if they could just give you a place which provided a list of all the pages that they had on the site! This is the Site Map for you.
What Is a Sitemap After All?
Technically, sitemap is a map of the site which can provide the visitor a clear cut layout of the pages as they exist on the site. Traditionally, the layout is linked to the relevant pages and the visitor can click a link to be taken to that page of the site. In this sense, you can say that it acts like a guide for a new visitor by providing the links to the different sections to the website. It will help the visitor in identifying a page that he or she is looking for and can reach to that page simply by clicking the link on the sitemap.
If you are looking for a definition of the sitemap, here is a definition from wikipedia -
A site map (or sitemap) is a list of pages of a web site accessible to crawlers or users. It can be either a document in any form used as a planning tool for web design, or a web page that lists the pages on a web site, typically organized in hierarchical fashion. This helps visitors and search engine bots find pages on the site.
Types of Sitemaps
As is clear from the definition of the Sitemap, as provided by wikipedia, there are two different categories of visitors to any site. The First Category is the Search Engine Bots. And the other category is the set of people who have come to your website looking for something of use to them. You have to satisfy both of these visitors if you want your website to be a success. Because there are two different types of visitors to your website, there are two different types of sitemaps one for each of the category of the visitors.
1. The HTML Sitemap
This is the sitemap for the visitors who are in the second category - the people who are on your site looking for something. Generally, it is a normal HTML page where the pages are listed in a hierarchical fashion and all the pages are linked to the respective page URLs. This helps in page navigation.
You can also employ CSS to make this page good looking. If you are good at JavaScript, you can also add some creativity and effects. Note that the better you convey the messages on this page, the better it gets for people visiting your site.
2. The XML SitemapThis is the sitemap that is meant specifically for the Machines and Programs (known as Bots, spiders) that are sent by a search engine to index your website. Google introduced Google Sitemaps to allow the webmasters publish lists of links from across their sites. The basic premise is that some sites have a large number of dynamic pages that are only available through the use of forms and user entries. The Sitemap files can then be used to indicate to a web crawler how such pages can be found.
Now you would be wondering - if that is the case, do I need different Sitemaps for all the search engines or, are the other formats and specs that I have to follow while creating a sitemap for Google different for those created for Other Search Engines? The good news is that Google, Bing, Yahoo and Ask now jointly support the Sitemaps protocol. This means that if you have successfully submitted your XML sitemap to any of these search engines, it means that the other major players will accept the same one too and you need not bother about creating a separate XML sitemap for the major players.
Advantages of a Sitemap
1. Satisfied Visitors
A site map's main benefit is to give users an overview of the site's areas in a single glance. You will not have any visitor who would say that the site is not providing great facilities and searching for some information on the site is easy. This means that the people visiting your site would be more than satisfied. They will be able to reach the pages they would have otherwise hunted for quite easily.
2. Flash Websites
Initially, the websites that were completely based on flash and other non-html content were mostly ignored by the Search Engines as they could not understand anything non-html. Now the search engine bots can identify the different pages on the flash website in case you have placed a correct XML Sitemap for them.
Important Tips for HTML Sitemaps
1. Start from the topmost level
Say for instance, you have Services page and from there you have a page on Application Development and Website Design. Arrange the hierarchy and display it as
+Home
|
+Services
|
-Application Development
-Website Design
2. Make the Sitemap Eye-pleasing
You have a wide range of colors and fonts to select from. Use your creativity and imagination to create a page that is eye-pleasing and soothing for the Visitor. Keep in mind that this to make the navigation easy. If the visitor can locate the page (s)he is interested in, you will not lose
a visitor.
3. Ensure No Broken Links on the Sitemap
Make sure that your site map will provide also the links to the important pages in your web site. Remember the main use of the sitemap that you are creating is to help visitors navigate. So cross-check that you have put all the links correctly and none of the links is missing.
4. Link It Up
Display a link to the sitemap on each and very page of your website (if possible). If that is not possible, at least ensure that the home page does have a link on it. You can keep two links for the sitemap on the homepage - one at the top and the other at the bottom.
How to Create XML Sitemaps
To create XML sitemaps there are different places on the web. You can do a google search for them. However, I, prefer using the
XML-sitemaps to create my XML Sitemaps. They are really easy to use. All you have to do is follow the following Four Steps and you are ready with the XML sitemap for your site -
1. Enter the URL and fill out some optional parameters that they need. For most cases, the default ones are fine. Use the Home Page URL for best results.
2. Click 'Start' button and wait until the site is completely crawled. This takes a few seconds (depends on how large the site is).
3. It generates a page reporting the missing or broken links, number of pages that were used and some information. If there were no errors, you would be taken to the fourth page.
4. Downlaod the XML File
Once you have downloaded the xml file for the sitemap, all you have to do is to upload it. You will need to upload it to the root folder of your website's folder. Then, as a last step, you would need to submit this xml file to the Search Engine.
Submitting XML Sitemap to Google
To submit your sitemap to Google, log in to your Google's Webmaster Account and upload the sitemap. You are done.
I do not know about you, but for me, I am feeling sick and bored of the look and feel of my existing operating system. After using that operating system for quite some years now, I want a change in the operating system on my PC and am currently weighing the different options that I have. For those who do not know, my current Operating System is Windows XP.
In this post, I would be discussing the Issues in migrating from one operating system to another. I would not be discussing about which operating system you should opt for and why. Instead, this discussion would be a general one highlighting the pros and cons of migrating to a new operating system as a user.
What are the options?
First Things First. When you are planning to migrate to another operating system, there are a few limited options to select from
a. Upgrade of Existing Operating System
This means, at the very core, the Operating System would remain the same and the only thing that is going to change is the Version. Say for instance you are planning to migrate to Windows 7 from your existing Windows based operating System. In this case, there are less issues and hassles.
b. A New Operating System
You are totally dissatisfied from the existing operating system (there may be several reasons) or you want to change the operating system just for the sake of getting something that would allow you to use many other applications. Say for example you are planning to migrate to Mac or Windows just because there are some applications that just won’t run on your existing Linux System. This involves a lot of issues and it will take time to get used to the new operating system.
What are the Issues?
1. Interface
The Interface is the biggest issue that haunts a computer user when thinking of migrating to another operating system. Over the period of time we get so much used to the operating system that any change in the interface is not acceptable to us. This is one of the main reasons that Windows
Operating system did not let go of the Classic Start Menu that it introduced in Windows 95, even though it has now introduced Windows 7 (the 8th version in the series of Microsoft Windows starting from Windows 95).
2. Applications
Almost all of the users of computers have a set of applications that they use. Now, when changing their operating system, if they are told that any of these applications will not work, users will not want to change their operating system. This is very true in case of Designers and Multimedia Authors.
3. Application Keystrokes
Changing the operating system may not only affect the set of applications that can be used but it can also affect the keystrokes that you are accustomed to. How about this - you are accustomed to using CTRL S to save a file on one operating system and on the new operating system it requires you to save using CTRL A. You would end up many a times using CTRL S (trying to save the file) but each time you would end up in getting something else done.
4. Shortcuts
When using windows on a computer we have accustomed ourselves that in case the mouse doesn’t work we can quite easily open the start button by pressing the Windows Key and viola the start button pops up as if we clicked it suing the mouse. Again if we want to run/open the windows explorer, we press the Windows Key and viola the windows Explorer opens up... There are so many good shortcuts that we are accustomed to. But when you migrate to another operating system, these keys loose their importance and you would be wondering what keystrokes does this new operating system provides.
5. Lingo
Not only keystrokes, initially, you would also get confused when it came to the Lingo of the new operating system. Say, for instance, you would be told to use the CMD key (On Mac), and this would leave you thinking - cmd... is it a command or something... coz on windows platform, CMD generally refers to the start of the Command Prompt.
6. Hardware Concerns
Well, after so many years with Computers, I think anyone can overcome these issues. It is just a matter of time and things will be okay in the long run.
But there is another thing that one must think about before making a selection of whether to migrate or not and that is the Hardware. In days when things are getting clumsier due to money games, there are times when you will be using a hardware designed specifically for an operating system.
Though, I am not sure on this, but then I wonder why Microsoft gives the Compatible Hardware Lists for some operating systems. So this issue is also to be considered when thinking to migrate to a new operating system. You would not want a piece of expensive hardware to go dead just because your new operating system doesn’t support it.
Which New Operating System to Migrate To?
It is a choice of preference and also the tasks that you are planning to do determine what operating system you should go for.
1. Work
If you are going to work on Adobe Products, you would not consider Linux or UNIX based systems. You would have to settle with Microsoft or Mac OS.
2. Gaming
If you are going to use your PC for mostly playing games, then again you would have to leave off UNIX/LINUX as there are not many games that are compatible with these platforms.
3. Security
In case you plan to change your operating system to something that gives you greater security from Viruses, Hacks, User Level Security and other securities, then I would recommend you to go for UNIX or LINUX based Operating System.
4. Hardware
In case you are planning to have a new Operating System, you also have to give a thought about the current Hardware that you have. Mac OS'
Leopard version is out for Intel Based Systems also but is yet to be officially tested and this rules out the use of Mac OS in case you have an Intel Based system. Similarly, Microsoft is not a choice for people who have MAC. It simply won’t install.
5. Data
Apart form the above issues; the crucial issue that will haunt you in case you are planning a changeover to another brand of operating system is the Data. Will you be able to use the data that you have stored using the applications on the current operating system? In most of the cases, if it is not a designing set of data, you would find programs, tools and utilities that would help you in resolving this issue. Again, the technology will be there and you would be able to transfer the data in most of the cases. Yes, it might require some extra input in terms of money and efforts in finding the right tools but that would be a price that you would have to bear.
6. Costs
That is the last major factor which will help you in determining which operating system you should Migrate to. Many LINUX flavors are free to use and have their limitations. Similarly Mac OS and Windows all have a price tag attached and it is you who has to decide whether it suits your pocket or not.
7. Help
The last issue is where and how to get help in the time period that you would need to master and learn the new operating system. On my part, I think, Internet has a vast library of help on all that and if you are willing to devote some of your precious time into learning the new operating system you can always think to migrate.
Now the last thing... I have not mentioned above... but you can in most cases install multiple operating systems on your computer. Though this requires a hard disk of higher capacity or two hard disks but this is a viable option for people who want to get the best of different worlds.
Hope you liked reading this post... Comments would be highly appreciated.
Cheers
For Windows users, the biggest problem that starts once you start loading more and more of useful Applications and create files, is - SPEED and overall performance of the Operating System. I had been suffering from this problem too and have been able to find out some tricks that helped me in solving the speed issue to a great extent. In this post I will be sharing some of those tricks so that you could benefit too.
You would be wondering Windows XP? That’s an operating system that Microsoft has shelved for quite sometime now and why the heck I am giving some tips for this operating system? So let me tell you that these tricks also work for Windows Vista and Windows 7 Operating Systems. Again, I believe that there are many users, like me, who still use Windows Xp. I had migrated to windows Vista but then had to revert back to Windows XP as there were many flaws in Vista...:( Sad, but true. Now I am in no mood to shift to Windows 7 however good it might be! And, there are many others who are still using older versions of the Operating System.
So for all the Windows Operating System Users, following are the tips that you can use to speed up the performance of your operating system.
1. Disk Scan
I would recommend using the scandisk utility that ships with the windows operating system. This utility does a thorough checking of the hard disks for any errors and fixes them if instructed. Perform the Scandisk with thorough mode settings and if you have any bad sectors on the disk they will get detected. This utility will also rectify the other errors in the file system like broken links.
2. Clean Up
Run a disk cleanup utility. The clean up utilities take care of removing the Temporary Files that get created as you work along with windows operating system. They clean the files in temporary internet folder, trash can, temp system files, etc. The advantage that you get from this is that the files are removed and there is more space on the disk available.
3. Dupe File Finder
There are times when we start copying files and this, results in files with same content but different filenames. I would recommend using an application that would help you in identifying the duplicate files and you can remove the duplicates to recover some disk space.
4. Defrag
Once you have removed all the temporary files, run the Defrag Utility (pre-bundled with Windows Operating System) on all partitions and all disks that you have. This will help in arranging the contents of the file which will help the operating system in accessing the files faster.
5. Registry Cleaner
After the removal of the non-required files and the Defragmentation of the Disks, it would be wise to run a registry cleaner utility which would scan the registry of the windows Operating System and correct it. Errors start getting into the registry files once you start installing and uninstalling applications on your windows operating system. All these errors need to be fixed and the non-repairable entries need to be removed. This will speed up the working of operating system.
6. Classic Styles
Under XP, you can tell Windows to use Classic Style on your desktop, - this will remove the neat single click and internet-style desktop but for lower end systems this will improve performance in other areas, such as gaming and multi-tasking.
7. Run Required Apps on Startup
When we start installing applications, several of them register themselves to start during windows startup. To cite an example - if you have installed Yahoo Messenger or Google Talk, these applications automatically start up when your operating system starts. Many a times we do not want such applications to keep running from the start. Run msconfig and under startup and only keep the programs that are essential to load in the tray icon (and hence stay resident in memory). Uncheck anything else non-essential, like an ATI or Nvidia control panel, Quicktime utility, Real Audio, etc.
8.
Upgrade drivers
Check for the latest BIOS, video, motherboard, sound, etc drivers from the manufacturers. A newer driver will help accessing the contents faster and this implies that the processing will be faster.
9.
Backup
Backup your files (data files) quite often. If you want you can store them or Re-writable media or also Pen Drives. Do this to keep the number of files on your computer to the minimum. This may not be actually helpful, but you can also boast of doing this when times are bad and you are recovering from a hard disk crash.
10.
Anti Virus
I know some of my friends had the habit of installing multiple anti-virus softwares on their computers just with the notion that many anti-virus mean a better security. Please if you have the same notions and beliefs, remove all of the anti virus software that you have on your computer and install a recommended or reputed anti virus application which also protects you from Internet. Read my earlier post on this.
As a last moment tip, you can also keep visiting the Operating System Manufacturers and the Software Vendors for knowing about the minimum system requirements needed to run the software. You might also consider an increase in the RAM or Hard Disk capacity to meet these requirements.
Hope you found this post useful... Comments would be appreciated as ever.
Cheers
Hi all. Let me start by wishing you a very happy and prosperous 2010. In today's post I will be telling you about some trick that you can use to make your rar files more useful.
Have you ever sent a rar file via email? In case you have done so, are you aware that WinRar needs the software to get the contents unzipped? Well I met with such a situation. Here is what happened -
A few days back, I had given a rar file to one of my students. It contained a set of questions and its solutions including some 35 images. The student took the file home for studying. But unfortunately he did not have WinRar on his PC. He called me up and told me the issue. I told him to download a copy of WinRar from the Internet but unfortunately he does not have an Internet connection. So I asked him to visit me the next day and get the file as an EXE (Executable) that won't require WinRar to unzip.
Many of us might have faced such a situation - where the rar or the compressed file will not open. I know that some of you will be more technical and would have found the way out. But many of us are just unaware. So for the sake of those special people who are unaware or are restricted to using allowed softwares only (many have restrictions that they cannot install softwares of their choice at office), I have found a way of creating executables for the compressed files.
Here is the process
1. Open Win Rar
2. Select the file(s) that need to be compressed into the executable.
3. Right Click and select Add Files to Archive or you can also click on the Add Button at the top. This will display the Archive Name and Parameters dialog box. In this Dialog, select the Create SFX archive checkbox.
Note: The name will change from Rar or Zip to EXE and this means that the compressed files will be placed in a Self Extracting file.
Some Other Tips
Archive Method
a. Rar
b. ZIP
Which one should I select?
The main advantage of ZIP format is its popularity. For example, most archives in the Internet are ZIP archives. So if you are going to send an archive to somebody, but you are not sure that your addressee has WinRar to extract the contents of the archive, it might be a good idea to use the ZIP format. On the other hand you may send a self-extracting archive. Such archives are slightly larger, but can be extracted without external programs.
Another ZIP advantage is speed. ZIP archives are usually created faster than RAR.
Note: If ZIP format selected, some advanced options, not supported by this archive format, will be disabled.
RAR format in most cases provides significantly better compression than ZIP. Another important feature of RAR is support of multi-volume archives. If you need to create a multi-volume set, use RAR volumes instead.
RAR format also has a few important features absent in ZIP such as recovery record, which allows the restoration of physically damaged data, and locking of important archives to prevent their accidental modification.
RAR format is able to handle files of practically unlimited size (up to 8,589,934,591 GB), when the maximum size of a single file in a ZIP archive is 2 GB. Note that older file systems do not support files larger than 4 GB and you will need to use NTFS to work with such files.
Compression Method
This specifies which compression mode has to be used and this in turn affects the size of the compressed file created. This depends on the selection of a Zip or Rar specified earlier.
Hope you find the post useful.
Cheers
When it comes to blogging, many say that you should be regular in making posts on your blog. As a matter of fact, this should be followed by all who are into serious blogging. The reason for the existence of this rule is quite easy to understand. The visitors of your blog expect new and fresh content from you. If they do not find this new content, definitely they are going to find other places where they will be able to get content. As a Blogger, you would never want this to happen.
But, we are all living in reality and there can be situations when you will not be able to make posts to your blog on the scheduled dates. So the question is “How Do I Handle such Situations?”
In this article, I will be discussing about using the Email section of the Blogspot. If you get into the backend of your blog (the Settings area) you would find a tab - "Email & Mobile" clicking this tab will display you the form where you can set the emails.
On this page, you will find two categories -
A. Email Notifications
This is the area which contains elements to capture the following inputs -
1. BlogSend Address
This is the place where you can place the emails for those whom you want to send the article you have just published on your blog.
As a Blogger, what is more important to you? Getting online visitors to read your content! Great. This is fine for many of us who need incoming traffic to get benefits (Any benefit is welcome!). But there are situations when you want to deliver the Articles that you write, to your community. As an example, let me say, you have a blog for your family. In such a case, you are not bothered about the traffic; instead, you are interested in getting the post/article to reach to your family members. Now, your parents, or someone in your family does not have access to your blog or maybe the person doesn't feel comfortable hooking on to the blog to read. So how do you make the posts reach to them? To sort out these issues, Blogspot provides you with the facility of sending out the post that you have just made as emails to all the addresses that you have put in this box.
How to Setup the BlogSend Address
In the text box provided against this option, type down the email IDs of all those people whom you want to send your posts as emails. Currently Blogspot has ONE restriction - You can use this space to send emails to 10 email IDs only.
Using BlogSend to send to more people
In case you have a larger list of emails that the posts have to be sent, you will have to create a group on some free site like Google or Yahoo that gets you an email allotted. You can add all those people, whom you want to send the posts via emails, as members and then you can use the email provided for this group to send your post to all members of this group.
B. Posting Options
1. Email Posting Address
This is the place where you are required to place a secret word that will complete the special email on the blogspot. Any email sent to this special email address will get published or otherwise (depends on your settings).
Once you have provided the secret word and completed the special email ID, any emails sent to this email ID will be used for Publishing purposes. Apart from completing the email address, you will also be required to select any one of the following options -
a. Publish Emails Immediately
Select this option if you are sure that any posts made to this email ID will be published without the intervention of any other person. If you select this option, you have to be careful that only those who should publish on the blog should be aware of this special email ID. Otherwise, anyone who comes to know of this email ID can send a post and it will get published automatically. The chance of moderation of such content is ZERO, though you can delete the posts as normal but this might be too late. So the tip is - "Keep this special email ID known only to yourself and other authors on your blog".
b. Save emails as draft posts
Select this option in case you want the posts via emails to be moderated before they are actually published. This is not very fruitful for those times when you are away from Internet or Blogspot as the submitted articles will just pile up and the visitors will not get new content to read.
c. Disabled
Select this option in case you want to remove the feature of publishing via emails. Select this option when you are back from your vacation and will be able to access your blog online.
2. Mobile Devices
This is the place where you setup your mobile handset and blogspot to work together. This is best suitable in situations when you are going out on a vacation and chances are that you will not be able to make posts using blogspot or email.
But, if you have a handset that supports sending MMS, then you can stay connected to your blog.
Configuring the Handset
Click on the Add Mobile Device link on the page. You will be displayed an applet where in you will be shown a code. All you have to do is to send this code to go@blogger.com.
In case your handset doesn't support MMS then you can send posts via SMS also. However, as of now, this facility is available to US residents only. Just click on the SMS link on the Applet to display the requirements for authorization.
A Few Words of Caution
1. Consult the manuals of your handset to determine whether it supports MMS
2. Consult the Service Provider about the amount you will be charged for sending MMS
3. If you want to place pictures on your post via MMS, Photos are currently limited to 250K each. If they exceed that size, you'll receive a bounce message letting you know so you can try again with a smaller picture. Note that your phone (or carrier) might have size limits of its own.
Sources:Google
Happy Blogging... And yes... Stay Connected!
Cheers
Have you ever thought about this – “What is the worst Nightmare for a Blogger?”. I think, the bloggers who use free blog service providers, like Blogger or Wordpress, the worst nightmare for them is the loss of the Blog. That is, one fine day you wake up and find the entire blog has gone down. The reasons can be many but the possibilities always exist.
The question is how do I prepare myself for this unwanted and unforeseen situation?
The answer is quite simple. Take a Backup of your blog on a regular basis.
How do I take this Backup?
There are different tools available for taking a copy or backup of your website and these tools often work fine with the free blog services also. But Blogger provides you a method of taking a backup of your blog and this is what makes it special (at least for me).
To take the backup of the blog at blogger, the first thing you have to do is to log-in to the control panel of the blogger. Once there, go to the settings tab and click the “Basic” Settings.

Here, search for Blog Tools (It is the first entry on the page). You wil find three links in this section –
a. Import Blog – The import Blog tool allows you to restore the blog that you had backed up earlier.
b. Export Blog – The export blog tool allows you to export the contents of the blog as an XML file that you can save onto your hard disk and use it later to re-create the blog.
c. Delete Blog – The delete blog tool allows you to delete a blog.
Now that we are going to take a Backup of the Blog, click on the Export Blog button. The next page that gets displayed is a message with another button. The message is self-explanatory – that you can export the blog as an atom format. Not getting into technicalities, this means a special format that blogger and other websites that understand XML and Atom Formats can decipher what is contained in the backup. Below this message you will find a button labeled “Download Blog”. Click this button to initiate the download process.
Once you click this button, it will prompt you to specify a location on your hard disk where you want to store the file. Note that only one XML file will get downloaded and this file will contain all that is needed. Give the appropriate paths and filenames. That’s all. You have a copy of your blog posts downloaded with you.
Backup the Template too!
The next thing that you might be interested in is taking a backup of your Theme especially if you have got the theme customized by someone or by yourself. This is essential just because it will save you the time re-creating the theme.
To take a backup of the theme, go to the layout tab in the control panel. From there, click the Edit HTML button. Here you will find the Download Template Button. Click it to initiate the download process. Specify the path where the file needs to be saved. You are done.
Hope you find the post interesting. Please feel free to comment or contact me.
Cheers.
In the last post, I had discussed how you can create users on your Windows XP Operating System. In this post I will be telling you how to protect your files, folders and even disk drives from being accessed by the other users of your computer.
As of now, you must have realized that merely creating different categories of users on the system does not implement much of the security. Its only that some tasks like formatting etc. are restricted.
STEP I: Getting The Security Tab
To implement the complete security features, you will need to make the Security Tab available in the properties of your drives, folders and files.
Under normal situations, Windows XP does not display the security tab when you right click and select properties for any Disk Drive or Folder or File on your Computer. To get this tab appear on the dialog box this is what you need to do
To enable and disply the Security Tab
- Click Start, and then click Control Panel.
- Click Appearance and Themes, and then click Folder Options.
- On the View tab, under Advanced settings, clear Use simple file sharing [Recommended].
Once you are done with this you will get to see the Security Tab in the Properties dialog box for every Disk Drive, Folder and File.
STEP II: Setting up the access permissions
Access control is the process of authorizing or restricting users, groups, and even computers (on a network) to access objects like Disk Drives, Folders, Files and other resources on the computer (or network).
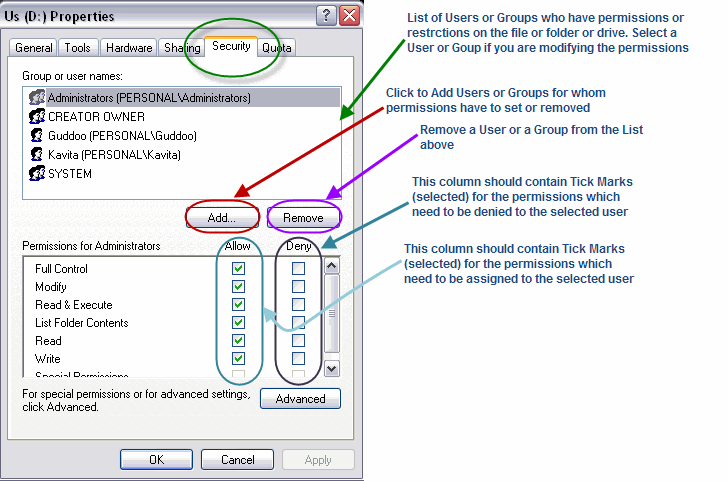
Right click on the object for which you want to set the permissions. (I have used the D: partition of my Disk for this example). From the menu that pops up, click on the Properties option to display the Properties Dialog box for the object. Here, select the Security Tab.
On the security tab, you would find the list of users and groups who have been assigned or restricted on the selected object.
"The Everyone Group":When you are changing the security for any folder or file for the first time, you will find a Group by the name “Everyone” in the list. If you select it you will find all the permissions that are assigned to this group for this object. The Everyone Group refers to all the users of the computer, as the name indicates. So, you can start by removing the Group from the list. To do so, select the Group and click on Remove. Once this is removed, the next task is to add up the users who will be granted the Access or Denied the Access.
To Add a user in the list, Click on the Add Button. This will display the Add User or Group Dialog Box.
Click on the Advanced Button to display another dialog box where you can find a list of all available users and groups on the system.
On this Dialog box, click on the Find Now Button to display the list of Users and Groups. Select the user or group to whom the permissions are to be given or denied. Click on OK to return to the above dialog which should display the name of the selected user or group. On this dialog, click OK to add the user or group in the Security Dialog.
Once back on the Security Tab
- Select the User you have just added.
- Use the Checkboxes under the Assign Column to Assign the permissions or under the Deny Column to Deny the Permissions.
Once done with the permissions, click OK.
Your Permissions for the file or folder are set and the user will or will not be able to access the contents depending upon the permissions you have just set.
Hope that you find this post useful. Looking forward to your comments and feedback.
Cheers.
Do you have a PC or Laptop at home which is accessed by others? Well, I have a Computer at home which is used by many including me, my wife and even my students who come to me for getting trained in various computer subjects.
Do you have files on your computer that you do not want others using your computer to access?
Well, well. Microsoft’s Windows XP comes with tools that allow you to implement user level security and the best part is that you do not have to be a geek to get those features implemented.
This is a two step process and here is the first step (the second step will be available in the next post) –
STEP I: Create different Users on the Operating System.
Windows XP supports three different kinds of users on a system –
- The Administrators – They are the users who have full control on the computer and can access any file or device on the Computer.
- The Restricted User – These are the users who can create files, use applications installed but cannot install new software or format drives. As the name suggests, they have a restricted access to the resources on the computer.
- Guests – These are the occasional users who are allowed to create files but these files do not get permanently stored on the computer.
To create a new user follow these steps –
- Open the control panel. The control panel can be opened using the start menu on Windows XP.
- Once inside the Control Panel, open the User Accounts Applet. The user Accounts Applet will allow you to create or modify user accounts.
- If you want to create a new User then select the Create A New Account button on the Applet.
- In the dialog box that follows, type in the name of the new user. Ensure that this name is unique as this will be used to access the Windows User Account.
- Then click on the Next button. In the screen that follows, specify what type of account this new account will be – An administrative account or a limited / restricted account. I would suggest that you create all other accounts except yours as Limited Accounts as this will ensure safety of all your files and data.
- Once done, click the create account. This will get the account created.
The purpose of this process was to create the new user accounts. So far, so good.
What is required next is the 2nd level of security to be implemented. If you do not follow the steps described below, anyone can click your username when XP starts and get access to the files and data that you did not want to share. So here is the 2nd level of steps –
Once the New Account is created, it will be displayed on the User accounts Applet.
Select the newly created account to go the page which will allow you to manage the account.
Use the options in the dialog box as described –
- Change the Name: This option will change the name of the user account. It asks you to enter a new name for this User Account
- Create a Password: This is the most essential step. You must provide passwords for all the accounts you create. This will prevent unauthorized persons from accessing your computer.
- Change the Picture: This option will change the Picture or Image or Avataar for the Account. The Avataar is normally displayed at the Login page of Windows XP.
- Delete the Account - This will delete or remove the user account.
Once done with the above steps, restart your computer to find the changes.
The major change that you should have found is that now windows displays a lot of icons on the login page where each of the Icon is followed by the User Account Name that you create.
In the next post, I will mention about the next part – How to secure your files from the multiple users that you have created in this session.
As ususal, I welcome any suggestions or queries. Please feel free to provide your feedback!!!
Cheers.