For all those who have been following up with my posts on modifying the Blogspot Template, today I will be telling you add some icons (pictures) to make your blog better in terms of professional looks. For this you will need a few icons. You can search for your own preferred set of icons but for those who do not want to waste time and get started right away, they can make use of the following icons.List of Icons that I have used Post Image
 Sidebar Icon
 Date IconNoteA point that I would like to mention before you start out searching for the icons, please note that the space on blogs is very less and you would love to save it for other purposes. So please search and download icons which are small in size. Generally, Icons with 16X16 pixels should be preferred but in case they are too small, go for 32X32 pixel icons.For getting the things right you will need to have a space with Google Sites. For those who do not know what is this can read my earlier post Use Google Sites to Upload and Place Links. You can use any web space but it is my recommendation to use Google sites, just because it is with Google. You already have a set of utilities that Google provides for free. So why not use it!In this tutorial we will be adding icons to our post headings, date stamps,..... For how your blog will look like after this exercise, you can have a look here.Once you have got the icons ready and uploaded on your space provider, log in to the blogspot account and goto the Edit HTML page for your blog.Placing The Icon for DateSearch in the CSS code for a section named h2.date-header. This is the block of CSS responsible for the display of the date stamp on the blog. You will have to put the following CSS in the existing block of CSS -
padding-left: 18px;padding-top: 0pt;background-color: transparent;background-image: url(the url of the Image / Icon as per your settings);background-repeat: no-repeat;background-attachment: scroll;background-position: left center;background-image: url(Place the Location of the Icon for Post Heading here);background-repeat: no-repeat;background-attachment: scroll;background-position: 10px 0.5em;background-image: url(place the Location of the Icon for Comments here);background-repeat: no-repeat;background-attachment: scroll;padding-left: 14px;background:url(place the Location of the Icon for Sidebar Headings here);background-repeat:no-repeat;padding-left:18px;
After reading through the earlier posts on the Templates (
Post I and
Post II) you might be thinking to make some modifications to your existing template. Well after this post you can change the Header of your blog and also get rid of that NavBar that Google provides at the top.
But before that, we need to move into understanding CSS. CSS is an acronym for Cascading Style Sheets and, as the name indicates, is responsible for styling out the sheet or the HTML for the page that you see in the browser. This was introduced to make keep HTML simple and make the formatting aspects of websites easier.
I will be modifying a blog - "
HTML, CSS and SEO Explained" during the course of this tutorial. You would find that this blog still has the Rounders template and by the end of this tutorial the theme would be modified to make it look a different theme altogether.
Now, after you have some basic understanding of the terms used in CSS, what is required now is to have some idea of what we are going to do. As I mentioned in the last post and even at the start of this one, the first thing that we would do is to get rid of the Traditional Header Background that the template provides me.
Changing the Header ImageWell, Blogspot provides quite a simple method to do this -
1. Log in to the backend of your blog
2. Go to the Layout and select the Page Elements tab
3. Click on the Section that displays the heading text for your blog. This will display the Configure Header Window where you can easily specify the image that you need.
4. You can also select whether current text on the Header of your blog will be displayed or not when this image is shown.
5. Once you have made your selections click Save button and voila the heading is changed.
The NavBar
Now that you have changed the header you would like to get rid of that NavBar that blogspot displays at the top of the blog page. But before you turn it off there are a few things that you must make a note of. The NavBar contains some essential tools and functionalities -
1. The Search Box - This provides the capability to search in your blog and is a really worthy function. If we remove this link, we would have to allow the visitors some place to do with their search. Blogspot has a gadget that will allow the visitor, or anyone, perform a search. So we can get rid of this functionality here.
2. The Sign-in Link - This allows you to log into Google services and also the blog (if you are the owner of the blog). If we remove this link, we can still logon to blogspot from their URL http://www.blogspot.com. Alternatively, we can place a Login link in one of the gadgets that we can add. So removing this feature will not affect the visitors.
3. The Customize Link - This link is to take us to the backend of the blog directly to the Layout section. If we remove this option, we can still get to the back-end after we log in to the blogspot. So removing this feature will not affect the visitors.
4. The Follow Link - This link allows someone to follow our blog. Alternatively we can setup the Follow Gadget. So removing this link also doesn't affect visitors much.
5. The Share Link - This link allows sharing of the blog into twitter, facebook and Google Reader. If we remove this link, we can add up the share gadget and the functionality remains the same.
6. The Report Abuse Link - I would never want anyone visiting my blog to use this option. So I do not need it. What about you? I think you would want to get rid of that too!
7. The Next Blog Link - This is a link that will take the visitor to a randomly selected blog away from my blog. So I don’t want to use it. I think you too would agree.
8. The Sign-out Link - Clicking this link logs me out of the Google Services. If you are mostly working on public computers you would not like to get rid of this option. So the alternate is to place this link in one of the gadgets. Remember we can use the same gadget for Login and Logout links.
Requirements if NavBar Is Removed
Now that we have understood the functionality of the NavBar, we have the following needs that we plan to have on the blog -
a. Login / Sign-in Link
b. Logout/ Sign-out Link
c. Follow Gadget - if not already on the blog
d. Search Gadget
Adding the Gadgets
Sign-in and Sign-out Links
Move the mouse pointer over to the Sign-Out link on the NavBar. Right Click and select Copy (IE) or Copy Link Location (Mozilla, Firefox)
1. Move to the Page Elements section in the Layout of the backend of your blog.
2. Click Add Gadget in any area where you want the links to be.
3. Add the HTML/JavaScript Gadget.
4. The Code Editor opens
To add the Sign-In link
5. Type the following code
<a href="http://www.blogspot.com/">Sign-in</a>
6. To add the Sign-Out link
<a href="PasteTheCopiedCode">Sign-out</a>
Replace the PasteTheCopiedCode with the content that got copied earlier
Once done, you can add the Gadgets for Follow and Search.
With all this information, we can now remove the NavBar. So get to the HTML Editor in the backend of your blog and move to the line just before.
/* Variable definitions */
Place the following code above that line
#navbar, #navbar-iframe {
   height: 0px;
   visibility: hidden;
   display: none;
}
Click Preview button below the editor and confirm that the NavBar is removed. Now you can save the template.
In case you have missed out find my eariler posts here -
Part I,
Part II.
In the post on Monday I would be telling you how to add images before the Post Title, Date of Posts and Other things to add glamour to your blog. Till then happy experimenting and learning.
Hope that you have understood the basics and have taken the backup of your template. Now we are ready to go.
1. The Code in the Editor can be categorized into three distinct segments -
a. Declarations section
The declarations section is the place where the blogger templates (or Themes) declares the variables that it allows you to customize at a later stage.
b. CSS Section
The CSS section contains the code that is related to the appearance of your blog in terms of colors, fonts, font sizes, the images that make up the blog look good. It does not, however, decide what images you put on your posts.
c. HTML Section
The HTML Section contains code that assembles and puts up everything that you see on the page. It does the integration part.
Note: As of now, CSS and HTML do not work with variables. So what Blogspot does is that it uses some server side programming that translates these codes into something relevant and something that your browser can understand. I am not going into details of how and what this is all about but, I would like you to make a note of this that CSS and HTML (as of now) DO NOT support the use of variables. I mention this just because you would be searching for HTML or CSS content on some other places for reference and you would find the same.
Lets start understanding from the start -
The few lines at the top are used to provide information aboutthe version of XML and XHTML or HTML that are being used in the HTML code of the page that is being created.
<?xml version="1.0" encoding="UTF-8" ?>
This is the declaration that tells the Blogspot interpreter about the version of XML that is being used in the template or theme.
<!DOCTYPE html PUBLIC "-//W3C//DTD XHTML 1.0 Strict//EN"

"http://www.w3.org/TR/xhtml1/DTD/xhtml1-strict.dtd">
This is the document definition and this tells about the Document Type Definition. It also specifies that the Strict XHTML Version 1.0 is in use. This definition, in short, tells and determines the rules that are to be followed during implementation of the HTML Tags.
<head expr:dir='data:blog.languageDirection' xmlns='http://www.w3.org/1999/xhtml' xmlns:b='http://www.google.com/2005/gml/b' xmlns:data='http://www.google.com/2005/gml/data' xmlns:expr='http://www.google.com/2005/gml/expr'>
This opens the <html> tag within which all the code for the template and generated html page must reside. It also contains some variables that are used by the blogspot backend during generating the content on your blog. This is closed at the end of the template using the code </html>.
The <head> element of the HTML code follows next. This element contains the variable declarations and the CSS code that together are used by the HTML code in the succeeding <body> tag.
<b:include data="blog" name="all-head-content">

</b:include>
This code is used by blogspot to include all the meta-tags and other links that are essential for the web page to be generated.
In the <head> section of your code, you'll need to have a pair of <b:skin> </b:skin> tags. The CSS style declarations will go in between those tags, along with the variable names that make your design work with the Fonts and Colors page.
Source:
Google
Note: The skin is a blogspot word and requirement. It is not an X/HTML or CSS specification. So it must exist in the template and we are to place our declarations of variables and CSS inside this element.
<!--[CDATA[
The term CDATA, meaning character data, is used for distinct, but related purposes in the markup languages SGML and XML. The term indicates that a certain portion of the document is general character data, rather than non-character data or character data with a more specific, limited structure. In an XML document or external parsed entity, a CDATA section is a section of element content that is marked for the parser to interpret as only character data, not markup. A CDATA section is merely an alternative syntax for expressing character data; there is no semantic difference between character data that manifests as a CDATA section and character data that manifests as in the usual syntax in which "<" and "&" would be represented by "<" and "&", respectively.
The Variables Section:
This section defines several varables. Some the values in these variables can be set using the Fonts and Colors page in the Layouts of the Blogspot Control Panel. Following is an explanation of the statement to declare varaiables
<variable name="mainBgColor" description="Main Background Color" type="color" default="#fff" value="#ffffff">
In the above code:
Variable states that a variable is being declared.
name states the name of the variable that is being created.
description specifies the detailed description for the Variable. This descirption is displayed in the Fonts And Colors Page for this variable.
type indicates the type of value this variable can hold. It can be - color, font, automatic.
default specifies the default value that this variable should contain.
value specifies the currently set value.
Based on the above example of code and the information that is provided, we can expect that the Main Background Color is stored in a variable named mainBgColor. This variable can contain values that will correspond to some color. The default value for this value as set in the template is White (fff is the hexadecimal code for White) and the current value too is set to White.

Hey, this post is getting too Technical! Let me give you a break and during this time find out some information that would help you to understand the CSS section that I will be discussing tomorrow.
The next post will dicuss the CSS and then I will give you some tips on adding your own Header Image and Removing the Navbar.
Happy Learning.
Those who missed out the first part of the series can find it
here
As a blogger, I am more interested in putting my content on the blog rather than playing around and many a times messing up with the code of the template that I am using. But I am not happy with the Template. How would it have been if I could just change the Image on the header or add another sidebar? Sounds familiar?
Many of us, bloggers, are not having much technical knowledge and so have to do with the templates provided free for use with Blogspot even though they do not like the template. Those who are a bit technical, do a Google search and find people or places where they can get the custom templates for use. Even if you get a template for use, you are unsure of how to use it for the best results.
So I thought to dissect the basic structure of the blogspot's templates and give you some tips and leads that you can use to learn and experiment on your own.
Pre Requisites -
Before we start I would recommend you to
I. Take a Backup of Your Current Template
To start with, take a back up of your current template before starting to work on the HTML section. This is essential just in case you mess up the template that you are currently using. It will save time, in case anything goes wrong.
II. Have Some Knowledge of HTML and CSS
Yes, you will need to have some knowledge of CSS and HTML before you delve into modifying the code. Trust me - HTML and CSS are easy to learn and remember you need not know all of those to work with templates. I will point out the ones and also try explaining a few as we go along.
How do I take a backup of my template?
Taking a backup of your working template is essential. This needs to be done just in case you end up messing up the template (to be honest, I did mess up many a times, at the start) that you have been using with all the gadgets and other things. You would never like your visitors to get shocked.
Log in to the backend of the blogspot and go to Layout and Click on Edit HTML. This will display the place where you edit your template. This page has the following different sections -

i. Back up / Restore
This section is to be used for downloading the current template as it appears in the edit template section. You will find a link with a caption - Download Full Template. Clicking on this link will display your operating systems Save As Dialog box and you can specify the location where you want to save your template file.
Below this are the Browse and Upload buttons. These can be used to upload the saved template from your hard disk to blogspot. You can use this in case you have done a download of the template or have a new template as an XML file. Click on the Browse Button. This will display your Operating Systems Open Dialog Box and you will select the Template file that you want to upload. Once done, click on the Upload Button to get the template on your blog.
ii. Edit Template
This is the section where we would be doing the editing of the template. Below the edit box are three buttons
Clear Edits - Click this button in case you do not want to save the changes that you have made into the template and want to revert back to the last saved stage.
Preview - Click this button to have a preview of how the template looks like after the changes are made. Note that the changes will not be saved and applied on your blog till you click on Save Template button. So Preview is just a method to look into the things before committing the changes. Clicking Preview will open a new window or tab and display you the page as it would look like if the changes are saved.
Save Template - Click this button to finally apply the changes to the template. Note that clicking this button has immediate effect and it is visible on your blog. So be sure before saving the template.
On Errors that I commit during the changes
In case you commit any error during writing the code, Blogspot will simply display the error message which can be seen at the top. The description of the error is just an indication of what has goes wrong. It will not display you the location where you have committed the error. You will have to search for the location yourself and correct it on your own.
Doing it the Right Way
After you have taken the backup of the template, the steps / procedure we will be using is -
1. Make the modifications in the Editor
2. Click on Preview - if you have errors, this will not be generated and you would be displayed the error messages. If your changes are acceptable, the preview will be generated in a new window or tab, depending on the browser you are using
3. If the changes are okay with you, click on save - This will make the changes permanent and visible on your blog from now on.
4. Continue with editing if needed
Here is how a normal, unmodified blog at blogspot looks like (I have used the Rounded Corners Theme. You will have a different look just in case you have a different theme)-
Watch out for the next post on modifying the templates and themes.
Good Luck.
When it comes to blogging, many say that you should be regular in making posts on your blog. As a matter of fact, this should be followed by all who are into serious blogging. The reason for the existence of this rule is quite easy to understand. The visitors of your blog expect new and fresh content from you. If they do not find this new content, definitely they are going to find other places where they will be able to get content. As a Blogger, you would never want this to happen.
But, we are all living in reality and there can be situations when you will not be able to make posts to your blog on the scheduled dates. So the question is “How Do I Handle such Situations?”
In this article, I will be discussing about using the Email section of the Blogspot. If you get into the backend of your blog (the Settings area) you would find a tab - "Email & Mobile" clicking this tab will display you the form where you can set the emails.
On this page, you will find two categories -
A. Email Notifications
This is the area which contains elements to capture the following inputs -
1. BlogSend Address
This is the place where you can place the emails for those whom you want to send the article you have just published on your blog.
As a Blogger, what is more important to you? Getting online visitors to read your content! Great. This is fine for many of us who need incoming traffic to get benefits (Any benefit is welcome!). But there are situations when you want to deliver the Articles that you write, to your community. As an example, let me say, you have a blog for your family. In such a case, you are not bothered about the traffic; instead, you are interested in getting the post/article to reach to your family members. Now, your parents, or someone in your family does not have access to your blog or maybe the person doesn't feel comfortable hooking on to the blog to read. So how do you make the posts reach to them? To sort out these issues, Blogspot provides you with the facility of sending out the post that you have just made as emails to all the addresses that you have put in this box.
How to Setup the BlogSend Address
In the text box provided against this option, type down the email IDs of all those people whom you want to send your posts as emails. Currently Blogspot has ONE restriction - You can use this space to send emails to 10 email IDs only.
Using BlogSend to send to more people
In case you have a larger list of emails that the posts have to be sent, you will have to create a group on some free site like Google or Yahoo that gets you an email allotted. You can add all those people, whom you want to send the posts via emails, as members and then you can use the email provided for this group to send your post to all members of this group.
B. Posting Options
1. Email Posting Address
This is the place where you are required to place a secret word that will complete the special email on the blogspot. Any email sent to this special email address will get published or otherwise (depends on your settings).
Once you have provided the secret word and completed the special email ID, any emails sent to this email ID will be used for Publishing purposes. Apart from completing the email address, you will also be required to select any one of the following options -
a. Publish Emails Immediately
Select this option if you are sure that any posts made to this email ID will be published without the intervention of any other person. If you select this option, you have to be careful that only those who should publish on the blog should be aware of this special email ID. Otherwise, anyone who comes to know of this email ID can send a post and it will get published automatically. The chance of moderation of such content is ZERO, though you can delete the posts as normal but this might be too late. So the tip is - "Keep this special email ID known only to yourself and other authors on your blog".
b. Save emails as draft posts
Select this option in case you want the posts via emails to be moderated before they are actually published. This is not very fruitful for those times when you are away from Internet or Blogspot as the submitted articles will just pile up and the visitors will not get new content to read.
c. Disabled
Select this option in case you want to remove the feature of publishing via emails. Select this option when you are back from your vacation and will be able to access your blog online.
2. Mobile Devices
This is the place where you setup your mobile handset and blogspot to work together. This is best suitable in situations when you are going out on a vacation and chances are that you will not be able to make posts using blogspot or email.
But, if you have a handset that supports sending MMS, then you can stay connected to your blog.
Configuring the Handset
Click on the Add Mobile Device link on the page. You will be displayed an applet where in you will be shown a code. All you have to do is to send this code to go@blogger.com.
In case your handset doesn't support MMS then you can send posts via SMS also. However, as of now, this facility is available to US residents only. Just click on the SMS link on the Applet to display the requirements for authorization.
A Few Words of Caution
1. Consult the manuals of your handset to determine whether it supports MMS
2. Consult the Service Provider about the amount you will be charged for sending MMS
3. If you want to place pictures on your post via MMS, Photos are currently limited to 250K each. If they exceed that size, you'll receive a bounce message letting you know so you can try again with a smaller picture. Note that your phone (or carrier) might have size limits of its own.
Sources:Google
Happy Blogging... And yes... Stay Connected!
Cheers
Have you ever thought about this – “What is the worst Nightmare for a Blogger?”. I think, the bloggers who use free blog service providers, like Blogger or Wordpress, the worst nightmare for them is the loss of the Blog. That is, one fine day you wake up and find the entire blog has gone down. The reasons can be many but the possibilities always exist.
The question is how do I prepare myself for this unwanted and unforeseen situation?
The answer is quite simple. Take a Backup of your blog on a regular basis.
How do I take this Backup?
There are different tools available for taking a copy or backup of your website and these tools often work fine with the free blog services also. But Blogger provides you a method of taking a backup of your blog and this is what makes it special (at least for me).
To take the backup of the blog at blogger, the first thing you have to do is to log-in to the control panel of the blogger. Once there, go to the settings tab and click the “Basic” Settings.

Here, search for Blog Tools (It is the first entry on the page). You wil find three links in this section –
a. Import Blog – The import Blog tool allows you to restore the blog that you had backed up earlier.
b. Export Blog – The export blog tool allows you to export the contents of the blog as an XML file that you can save onto your hard disk and use it later to re-create the blog.
c. Delete Blog – The delete blog tool allows you to delete a blog.
Now that we are going to take a Backup of the Blog, click on the Export Blog button. The next page that gets displayed is a message with another button. The message is self-explanatory – that you can export the blog as an atom format. Not getting into technicalities, this means a special format that blogger and other websites that understand XML and Atom Formats can decipher what is contained in the backup. Below this message you will find a button labeled “Download Blog”. Click this button to initiate the download process.
Once you click this button, it will prompt you to specify a location on your hard disk where you want to store the file. Note that only one XML file will get downloaded and this file will contain all that is needed. Give the appropriate paths and filenames. That’s all. You have a copy of your blog posts downloaded with you.
Backup the Template too!
The next thing that you might be interested in is taking a backup of your Theme especially if you have got the theme customized by someone or by yourself. This is essential just because it will save you the time re-creating the theme.
To take a backup of the theme, go to the layout tab in the control panel. From there, click the Edit HTML button. Here you will find the Download Template Button. Click it to initiate the download process. Specify the path where the file needs to be saved. You are done.
Hope you find the post interesting. Please feel free to comment or contact me.
Cheers.
Many a times we
bloggers have the necessity to place content, especially links to files, for download purposes. This is because Blogger/
Blog spot and even other Blogging Sites like
word press, do not allow their users to place content except their own pictures, images or videos. I had tried several methods but most of them failed.
We are aware that there are plenty of free websites that allow you to host your files like -
Scribd
for word files, Flicker for Pictures, You Tube for Videos and a whole lot of others. The disadvantages with most of them are that these files are hosted on their
web space and their availability depends on their rules and regulations.
In this post I will be explaining the steps to host a file with Google itself. The reason for selecting Google is that Google owns the
Blogspot and hence
Google's services gel/blend well with this
blog sphere.
Following are the steps that you can follow to place links to your files inside your post
A. Register with Google Sites for free. You should have a google account for this purpose. This ID will give you access to all the services provided by Google. So in case you do not have a
g'ID then
create one. Its just an email Id that works well for almost all of their services.
This place allows you to have some space (100 MB) on the Internet and the files can be placed here. Once the account has been created and you log into the Google Sites, google prompts you to create a site. Click on the create Site Button. You will be displayed the following page -
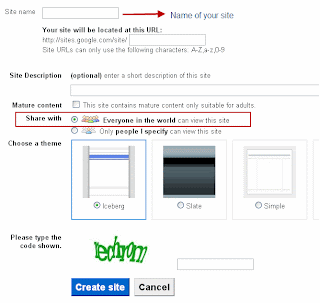
On this page:
1. Type in a name for your website. it will be a folder inside the http://sites.google.com/site/
2. Type in the
decryption for this website
3. If you plan to show Mature (Adult) content you must select the Mature content Button
4. Share with: Ensure that you select everyone in this world can view the site. This is because you want the content here to be made available for all on the
Internet
5. Choose a Theme: Select the theme that your website should have. It should go by the color
combinations you selected for your blog theme.
6.Then enter the
Captcha and finally click the create site button
Once done you will be taken to the Home page of the site you just created.
As our objective is not to create a web site, I will not be mentioning on how to manage this website in terms of creating pages, navigation bars etc.. Instead here is the process to upload the files(
Pdf's, or any other files) that you want to share -
7. After creating the site, and moving to the home page of this site, you will see a More Actions Button on the top right hand side. Click to see the options - and select Manage Site.
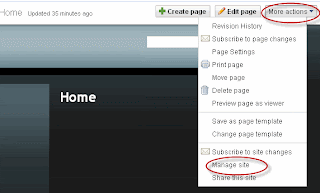
This will take you to the site manager window.
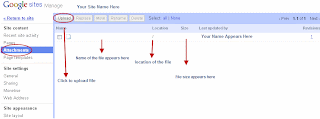
On the Site Manager, click the Attachments Button on the left hand side to display the attachments page.
Click on the Upload button located on the top left to get the upload file dialog box. Specify the file and upload it. Once uploaded, it should reflect on this page.
Once you have this attachment displayed, move your mouse pointer to the file name. Right Click and Select Copy Location. This is the Link which will be placed in the blog post.
Now come back to your Blog Post manager. In the Editor, Select the text that you want to link for this file. Click the Link Button and paste the link that was copied. Viola. You are done. Publish the Post and verify the download works correctly or not.
Hope you found the tutorial of use. Your feedback is essential.
Thanks.


 Post Image
 Sidebar Icon
 Date Icon


