We are aware that there are plenty of free websites that allow you to host your files like - Scribd
for word files, Flicker for Pictures, You Tube for Videos and a whole lot of others. The disadvantages with most of them are that these files are hosted on their web space and their availability depends on their rules and regulations.
In this post I will be explaining the steps to host a file with Google itself. The reason for selecting Google is that Google owns the Blogspot and hence Google's services gel/blend well with this blog sphere.
Following are the steps that you can follow to place links to your files inside your post
A. Register with Google Sites for free. You should have a google account for this purpose. This ID will give you access to all the services provided by Google. So in case you do not have a g'ID then
create one. Its just an email Id that works well for almost all of their services.
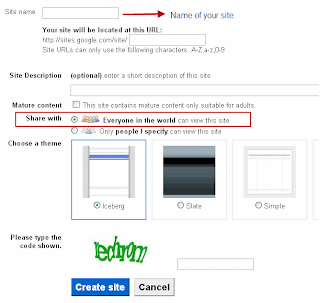
This place allows you to have some space (100 MB) on the Internet and the files can be placed here. Once the account has been created and you log into the Google Sites, google prompts you to create a site. Click on the create Site Button. You will be displayed the following page -

On this page:
1. Type in a name for your website. it will be a folder inside the http://sites.google.com/site/
2. Type in the decryption for this website
3. If you plan to show Mature (Adult) content you must select the Mature content Button
4. Share with: Ensure that you select everyone in this world can view the site. This is because you want the content here to be made available for all on the Internet
5. Choose a Theme: Select the theme that your website should have. It should go by the color
combinations you selected for your blog theme.
6.Then enter the Captcha and finally click the create site button
Once done you will be taken to the Home page of the site you just created.
As our objective is not to create a web site, I will not be mentioning on how to manage this website in terms of creating pages, navigation bars etc.. Instead here is the process to upload the files(Pdf's, or any other files) that you want to share -
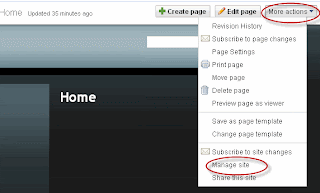
7. After creating the site, and moving to the home page of this site, you will see a More Actions Button on the top right hand side. Click to see the options - and select Manage Site.

This will take you to the site manager window.

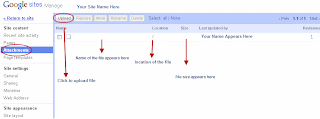
On the Site Manager, click the Attachments Button on the left hand side to display the attachments page.
Click on the Upload button located on the top left to get the upload file dialog box. Specify the file and upload it. Once uploaded, it should reflect on this page.
Once you have this attachment displayed, move your mouse pointer to the file name. Right Click and Select Copy Location. This is the Link which will be placed in the blog post.
Now come back to your Blog Post manager. In the Editor, Select the text that you want to link for this file. Click the Link Button and paste the link that was copied. Viola. You are done. Publish the Post and verify the download works correctly or not.
Hope you found the tutorial of use. Your feedback is essential.
Thanks.


0 comments :
Post a Comment